As sensors get denser with pro-spec cameras, there seems to be some lethargy in adopting a higher and faster storage medium.
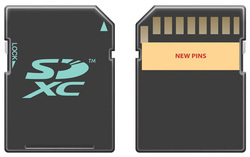
January 2011, the SD Association announced a new high speed SD card called the UHS-II. Now in 2013, we have yet to hear a peep from DSLR manufacturers who have adopted this new standard for pro spec video or still cameras. So what the fuck is going on here?
As sensors get denser with pro-spec cameras, there seems to be some lethargy in adopting a higher and faster storage medium. Low light. The dreaded word for all camera sensors. Many claims have been made with the iPhone being able to handle low light situations but the results are rather subjective. So what can do you do about it? Ante up on a accessory.
One of the benefits of having an iPhone is that you have loads of accessories to choose from. Take for example this contraption from Gary Fong, the once famous photographer, which acts like a tripod. I like stuff like these but in the end I rarely end up using them as they are not practical. For one, you need to have level ground to shoot from to use it. Now, that's rarely a choice when you are out shooting. A bean bag or a gorrilapod would be a better choice but none of them come with a iPhone rig that enables you to mount it. There are plenty of tripod mounts for the iPhone but none come with a simple solution. Just because the president of the United States holds his camera the wrong way doesn't mean you should too. I was aghast at this very picture when it appeared online. Not because it was an endorsement for Canon, but rather how it can become a souce example on the right or wrong way to hold up a DSLR.
"Hey look, President Obama holds it up this way so I must be right!" Go ahead. Shoot that blurry picture. I know you want to. Hand Holding Damage Control When I was consulting for Sony, we had an in-depth discussion on how to address camera shake as the public at large will be taking the inbuilt stablizing mechanism for granted and by holding it any way they want, they could induce camera-shake and later blame it on the mechanism for not working. We went into detail on what should be publicized and at the same time find out why people are more inclined to hold cameras that way. It became apparent that this was what people did with point and shoot digital compact cameras (DCC). You held it up by the sides and avoid touching the barrel as DCCs had a moving zoom lens which you are not suppose to touch. So this was carried over to DSLRs and became an unconscious hand holding method. In the end, we had to rectify this and we did a series of "how-to" tutorials just to teach people the right and wrong way to hold the DSLR. Palm Support for DSLR The correct way to hold the DSLR stems from the time of SLRs. You placed your left palm under the DSLR to carry the weight of the camera, sort of like cradling it, while your thumb and forefinger worked the lens focus ring. These days, with all DSLR having autofocus, the need to focus with your fingers has been negated but that doesn't mean you can't or are not suppose to do this. Using your left palm to support both the camera and lens of a DSLR has become even more crucial in the digital age for one simple reason. Weight. In the old days, the SLR was an all metal beast, and this included the lens. The weight of the camera and lens together was a stablizing factor once you held it right. What's more, Pros will have their motor drive mated to their SLRs giving them even more weight to carry. In physics, all physical objects have a center of gravity and you need to take advantage of this as a stabilizing force. DSLRs today are made to be far lighter and smaller and unless you had one of those with a huge battery pack, chances are they are far lighter than the SLRs of old. Stablizing Factors Holding it correctly is probably only one part of the equation, you also need to know how to lock your elbows to your chest for additional stability. Then there is the question of inbuilt anti-shake stabilizers which unfortunately is not going to save you even if you held your DSLR wrongly. Trusted that some systems can save you up to 2 stops in camera shake, this is by far only an estimation. The problem is simple, testing anti-shake mechanisms is like dabbling in the blacks arts. What are the parameters for testing camera shake? Do you need a Richter scale? How much shake is attached to each camera stop? In 2009, Nishi labs came out with a machine that could measure camera shake from mirror and shutter movement but that's hardly useful if you want to measure real life situations. "Got a earth quake coming? No problem, my camera can handle that." Oh so you think. Each camera manufacturer has a different value and different way of measuring these stablizers. There is no standard ISO based system to determine this. What some third parties have done is to determine the effectiveness of Lens based shake stabilizers versus Camera based one. It was later apparent that lens stablizers were more effective in long telephoto lenses while camera based stablizers were better at low to medium range telephoto ranges. Regardless of these finding, you still need to learn how to hold your camera properly to stop those blurry pictures from happening. I'd be more than happy to demostrate this if someone in the White House needs a lesson in this. This is a nice spot of news for film photogs who want to transfer their analogue images to digital. Lomo has successfully rounded off a series of Kickstarter projects including this one, a portable film scanner which makes use of your digital camera to scan film negatives and positives.
This nifty device has been three times oversubscribed on Kickstarter so it is a go. What you do with it of course is simple, run your roll of film through this device with your iPhone or Android device and it will convert those images to digital. What I like about this is that you don't have to get any other external device. Previously, the only way to do this sort of film scanning was on the iPhone with the use of the iPad. The iPad becomes your lightbox, the iPhone's camera then becomes the scanner. The conversion was super fast but if you look at the set up cost (you need both an iPad and iPhone), it will hurt your piggy bank. The other way of course was to use a digital camera, lightbox and a computer program like Photoshop which converts film negatives into digital images. To do this successfully, you must also invest in a good macro lens for that digital camera. The set up cost could run in gazilions of dollars so let's not go down this path. Lomo's film scanner on the other hand will be relatively cheap to build but don't expect super scanning quality from you smartphone device. There will be an app that you need to download in order to use with your Lomo film scanner though I can't fathom how this is going to prevent someone from getting the app, and using a lightbox with a 2x Loupe to scan images. Essentially, that's what you reall need. A good 2X film loupe and you'be scanning away with your iPhone or Android device. What you don't have is the conversion software needed to turn the negative into positive images. There are a few available on both mobile platforms so you need to look them up. There is also the question of quality. Trusted that this Lomo gadget is going to be cheap so you could save a few bucks at the photo lab but heck, your iPhone is only 8 megapixels. And I doubt it will be in full resolution after scanning and cropping. It would be quite safe to assume that your newly scanned images will be more like 5 to 6 megapixels as this is basically all you need to get a 4R or 8R print. For more on this pleae click here. All this while, turning your old negs into digital was a hassle. You could do this in most photo labs and it doesn't really cost that much either. If you shoot regularly on film and need to convert this, like it or not you still need to send your undeveloped film to a photolab before you can get them back. The only exception to this rule is when you are a chemical junkie or sorts who develop your own film at home, it would make good sense to scan your own film at home too. This is where digital meets analogue. Having use some film cameras without the benefit of lightmeters, you probably need something to help you get that exposure right. Everyone talks about the Sunny 16 rule, which is fine but it only works when you have sun. The basis of the rule is to use f/16 with a shutter speed of 1/100 sec for ASA 100 film, and you change this shutter speed upwards to 1/250 for ASA 200 and 1/500 for ASA400. In other words, you push this speed up by one stop each time you use a film faster than 100ASA.
Fine. What about a cloudy day? Or maybe a shadow or indoor area that needs to be shot? Sunny 16 isn't going to work. I use an iPod Touch with an app called MyLightmeter. It has a nifty looking UI and is a nice package. I can use my Android phone to do the same but prefer not to. Once you have it on the whole day, the battery will drain and you're left without a means of communication. I find it much safer to use an external meter to address this sort of problems. Then you have the physical light meters which are great too. I have four. One hand held Seknonic, one old Kodak meter from the 1960s, a new Voigtlander meter and the dedicated Pen F clip on meter. The Pen-F is a CDS meter, requiring a battery and it is not as accurate as the built-in meter in the Pen-FT. I had to test the accuracy to know how far it was off before using it. Using the readings from the Voightlander, I found out that the clip on meter was one stop under. Phew, that was a relief as I can easily compensate for this by dialing in a higher ASA for the meter. By calibrating the meter to ASA 200 when using ASA100 film, you are essentially compensating for the lost of 1 stop. This also means that the meter will not be just a display piece but a working meter which you can use in actual photography. Spiffy indeed. I am about done with a multi touch book I am working on for the Apple iBook store, this image shown here was one that got rejected from the batch I have but I do like it. Initially, it was quite dull, then I put that through Lightroom and used by HDR presets to bring out the details and the color. I often realize that most pictures look dull because it lacks detail, and to get this detail, you need to do some crafty post processing. This is great if you happen to have Lightroom but it's virtually useless if you only have the standard image editing program that came with your digital camera.
Those are fine if you want to adjust contrast and tone but to turn it into something like this would require more control over you images. I shoot mainly in RAW these days, after which I send that into Lightroom and do what I need with it. The nice thing about the workflow is that Lightroom offers non destructive editing of the master file, which is great. Once you are happy with the final result, you export it out as a PNG or JPG. I don't bother much with DNG for now as it takes up too much space on my HD. I like DNG files as a means of perserving my photos in digital, and PNG as a second choice as it can be viewed on a standard web browser. DNG is not user friendly as you need a photo editing app that can open these files. DNG's main advantage is that you are holding all the image details within the pix, and the data is uncompressed. You can do the dame with PNG files in 16 bit format but that's a little hard to muster if you have limited space on your HD. Ever since digital became the mainstay, HD capacities have grown and no matter how much it has grown, it's still not enough. Flickr may have rescued the day with a 1TB limit. But sadly, that's not going to last if you store hundreds of megapixels every day on your account. You still need to generate those files and have a copy stored up somewhere at home instead of having it uploaded up to the cloud. Flickr accepts files in PNG. There is another player, 500px.com, which also gives you a gallery of sorts but they are more conservative by allowing you a limited number of uploads and they don't accept PNG files. So what's the best workflow? For the time being, PNG files are way better for me and Flickr has it. Once you have a lossy file in a compressed JPG format, it is just not worth saving up to the cloud as a back up. Why bother? Sharing is low res JPG anyway so if all you ever do is that odd FB photo which you post to your timeline, then stick to JPG. If you really need a backup space, then start at Flickr, save your files in PNG. Need more space? Then set up another account. 1TB is a probably good for a year if you shoot often and want to back up to the cloud. What about other Cloud Services? Been there, done that. Again, not worth it. You can save your PNG files to Dropbox or Box.net but those service don't give you much space. The most I ever got from Dropbox was 50GB. That's a paltry sum compared with Flickr. In fact, that is all that cloud services want to give you for a limited time. Anymore than that, you'd have to pay. This is quite interesting, if you care to examine the Flickr usage data based on manufacturers, you'd realize that most of them are high end compacts and smart phones.
I have always believed that Flickr in recent past didn't quite capture the imagination of photographers and many still prefer to use mobile apps to share. Flickr has its own community but few use it regularly. I don't use it regularly either and for good reason. But with the recent change by Yahoo, with 1TB free to use. I think that will be a good thing. I rarely think of sharing my photos at full resolution, It just don't make sense. Upload times are problematic and downloads over a slow line will take forever if you have a handful of 24 megapixel photos. Let's see how this works out as the features are fresh, you'd know in six months if this will inspire people to host with flickr once again. |